Overview
This guide provides a comprehensive walkthrough for deploying GitLab on QBO, leveraging its powerful features such as integrated load balancing, automated wildcard TLS certificates, and MinIO as a backend for GitLab’s container registry.
QBO simplifies the deployment of GitLab with SSL, Pages, Registry, and MinIO, making it an ideal solution for organizations looking for a lightweight, scalable, and highly available GitLab instance. With QBO running Kubernetes inside Docker, the platform ensures high performance, minimal resource usage, and portability across public, private, and air-gapped environments.
Key Benefits of QBO for GitLab Deployment:
- Metal Performance: Get near-native performance on any hardware.
- Portability: Easily migrate between public, private, and air-gapped environments.
- Minimal Footprint: Everything is containerized within Kubernetes in Docker, reducing overhead and improving efficiency.
- Integrated Load Balancing: QBO assigns load balancers automatically via Kubernetes.
- Wildcard TLS Certificates: QBO provides automated wildcard TLS certificates for seamless HTTPS deployment.
- MinIO as a Registry Backend: Ensures efficient object storage for GitLab’s container registry.
Prerequisites
Before you start, ensure you have the following:
- A working QBO cluster
- Helm installed
- Kubectl configured to interact with the cluster
Step 1: Set Up Environment Variables
The script requires an environment file (env) containing:
DOMAIN=cloud.qbo.io |
Ensure this file is created before proceeding.
Step 2: Install Required Dependencies
Install necessary packages for processing environment variables:
sudo apt update && sudo apt install -y gettext |
Step 3: Set Up QBO Cluster
Check if the cluster exists, and create it if it does not:
qbo get cluster <cluster-name> | jq -e '.clusters[]?' |
Retrieve and set the kubeconfig:
export KUBECONFIG=$HOME/.qbo/<cluster-name>.conf |
Step 4: Verify Cluster Nodes
kubectl get nodes |
Step 5: Install GitLab Helm Chart
First, add and update the Helm repository:
helm repo add gitlab https://charts.gitlab.io/ |
Generate the configuration file:
envsubst < values.envsubst > values.yaml |
Deploy GitLab using Helm:
helm upgrade --install gitlab gitlab/gitlab -f values.yaml |
Step 6: Set Up Wildcard TLS Certificates
Retrieve the wildcard certificate and key provided by QBO:
KEY_CONTENT=$(qbo get acme -A | jq -r .acmes[]?.privkey | base64 -w 0) |
Create the Kubernetes secret for the wildcard certificate:
kubectl apply -f - <<EOF |
Verify the certificate:
kubectl get secret wildcard-tls -n default -o jsonpath="{.data.tls\.crt}" | base64 -d |
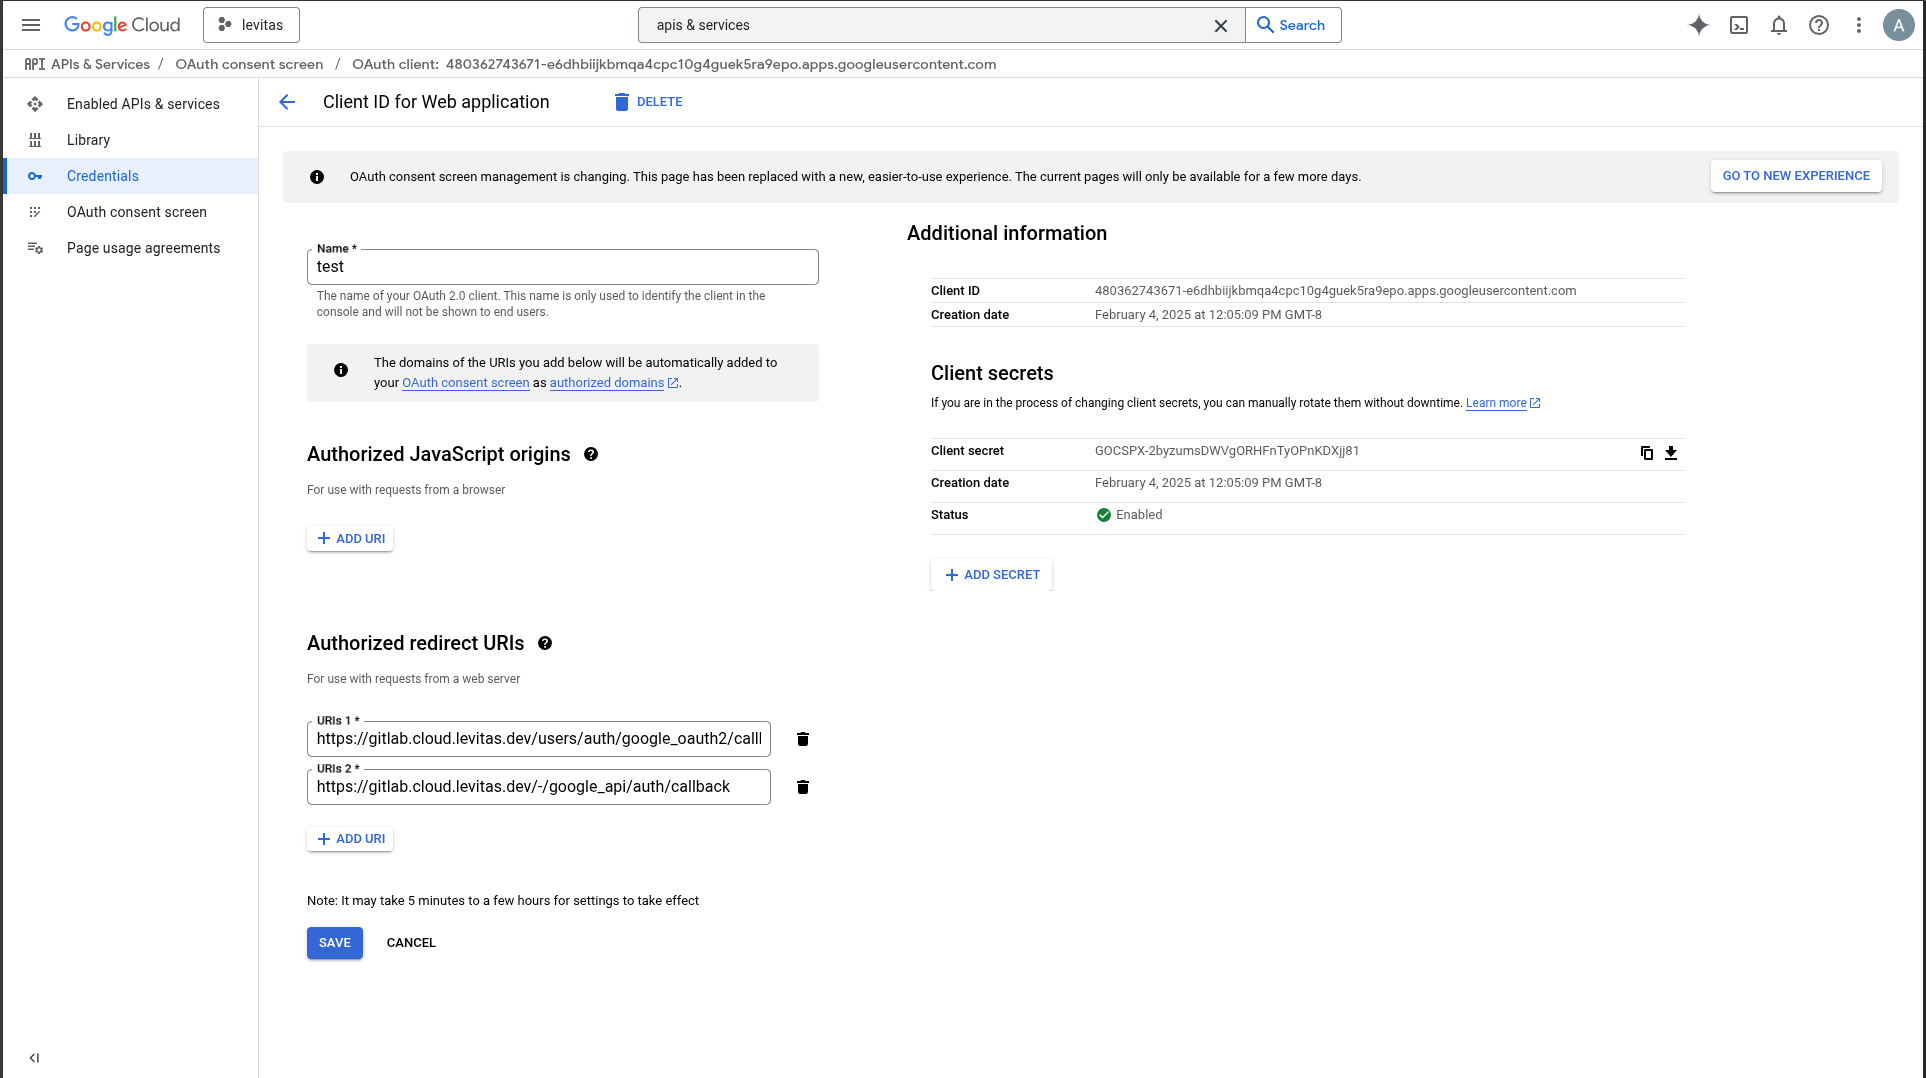
Step 7: Configure Google OAuth for GitLab
Create a Kubernetes secret for Google OAuth credentials:
kubectl create secret generic gitlab-google-oauth2 --from-literal=google_oauth2='{"name":"google_oauth2","label":"Google","app_id":"$CLIENT_ID","app_secret":"$CLIENT_SECRET","args":{"access_type":"offline","approval_prompt":""}}' --namespace=default |
Verify the secret:
kubectl get secret gitlab-google-oauth2 -o jsonpath='{.data.google_oauth2}' | base64 --decode | jq |
Step 8: Configure DNS Records
Ensure the following A records are created in your DNS provider:
A <LoadBalancer-IP> registry.$DOMAIN |
Verify DNS propagation:
nslookup gitlab.$DOMAIN |

Step 9: Access GitLab
Retrieve the initial root password:
kubectl get secret gitlab-gitlab-initial-root-password -ojsonpath='{.data.password}' | base64 --decode ; echo |
Access GitLab via:
URL: https://gitlab.$DOMAIN |
Step 10: Restart GitLab Services
Restart necessary GitLab deployments:
kubectl rollout restart deployment gitlab-webservice-default -n default |
Monitor pod statuses:
watch kubectl get pods |
Step 11: Verify Ingress, Load Balancers, and Persistent Volumes
Check the assigned load balancer:
kubectl get svc gitlab-nginx-ingress-controller -n default -o jsonpath="{.status.loadBalancer.ingress[0].ip}" |
List the created ingresses:
kubectl get ingress |
Verify persistent volumes:
kubectl get pvc |
By leveraging QBO’s metal performance, portability, and Kubernetes-in-Docker architecture, GitLab runs with minimal footprint, ensuring maximum efficiency in any environment. Whether you are deploying in a public cloud, private cloud, or air-gapped environment, QBO enables seamless operations with built-in automation, robust security, and integrated load balancing. Additionally, MinIO serves as a backend storage for GitLab’s container registry, providing a scalable and resilient object storage solution.